The seven steps are written out below.
Captions available — press CC · Also on YouTube
Why fewer is better
Every plugin on your site was added for a good reason: a form, a gallery, a cookie banner, something a tutorial said you needed. Nobody adds them all at once. They arrive one need at a time, and almost nothing ever takes one away.
Each one is another piece of software from another author, with its own updates, its own settings and its own way of asking for your attention. WordPress's own Site Health screen puts it plainly: plugins "have deep access to your site, so it's vital to keep them up to date". The security company Wordfence went further in its 2024 report: plugins accounted for 96% of the WordPress vulnerabilities disclosed that year, and "removing unused and abandoned WordPress plugins and themes may be critically important".
There is no magic number, and WordPress doesn't set one. What matters more than the count is that every plugin on the site is one you use, one that is still looked after, and one that isn't doing a job something else already does. The seven steps below get you there without breaking anything, in an order that lets you undo each step.
Step 1: Back up first
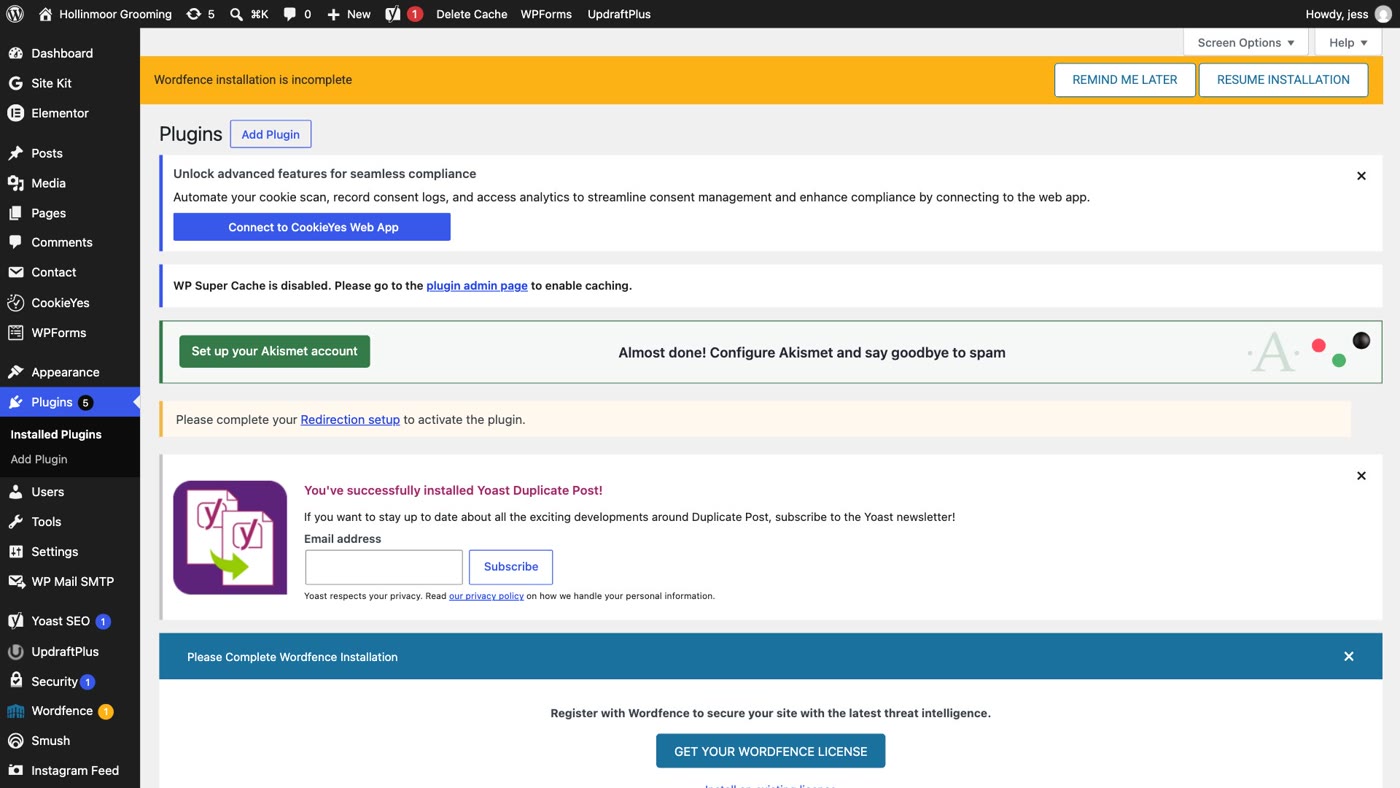
Everything below is reversible, as long as you have a copy of the site from before you started. WordPress's own guidance is to have a current backup before you update plugins, and the same goes for removing them.
- Open your hosting account (the company you pay for hosting, not WordPress). Most hosts have a page called Backups.
- Make a backup now, or check that last night's is there. Use the "Back up now" button if there is one, and wait until it says it has finished.
- No backups at your host? A backup plugin does the same job. If you already have one, run it now and keep the copy somewhere other than the site itself.
Step 2: Find the ones you don't use
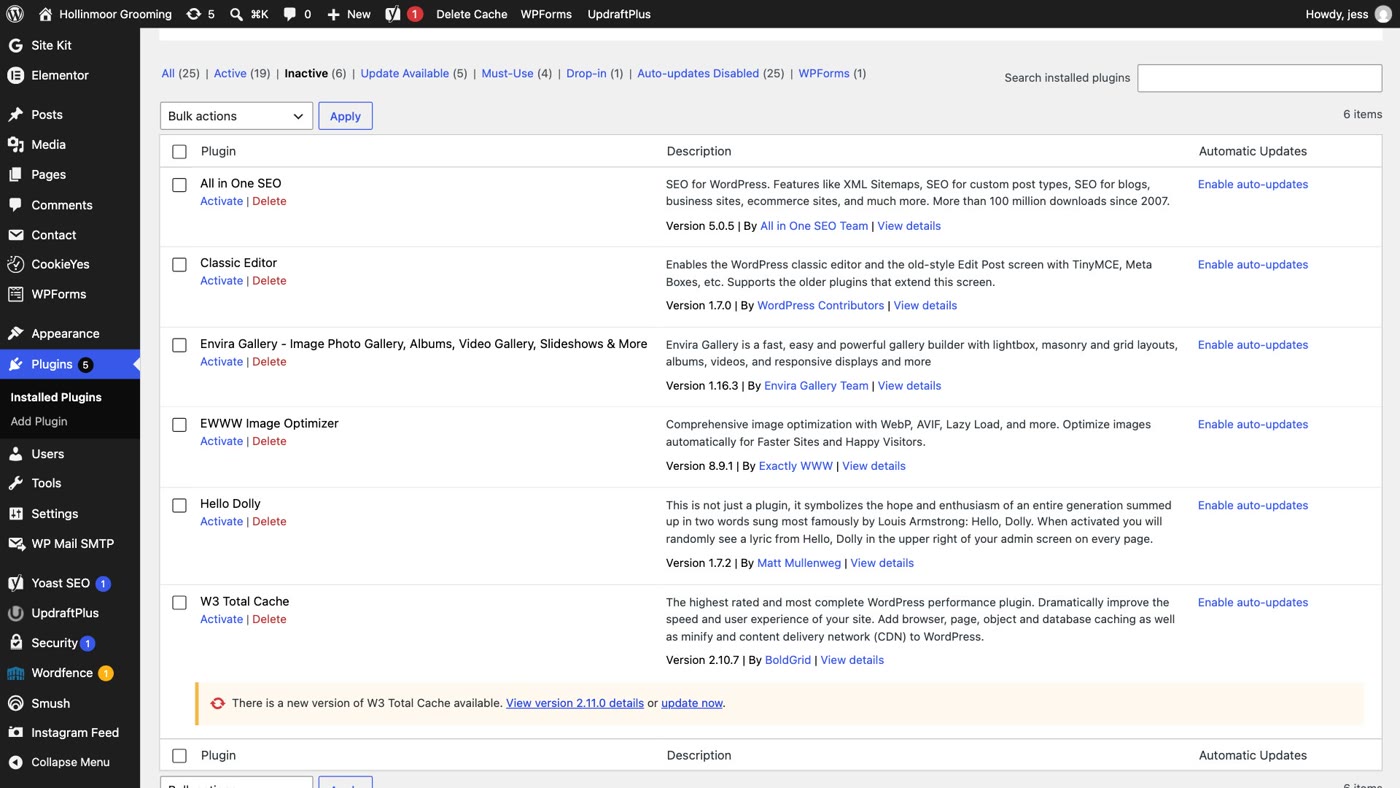
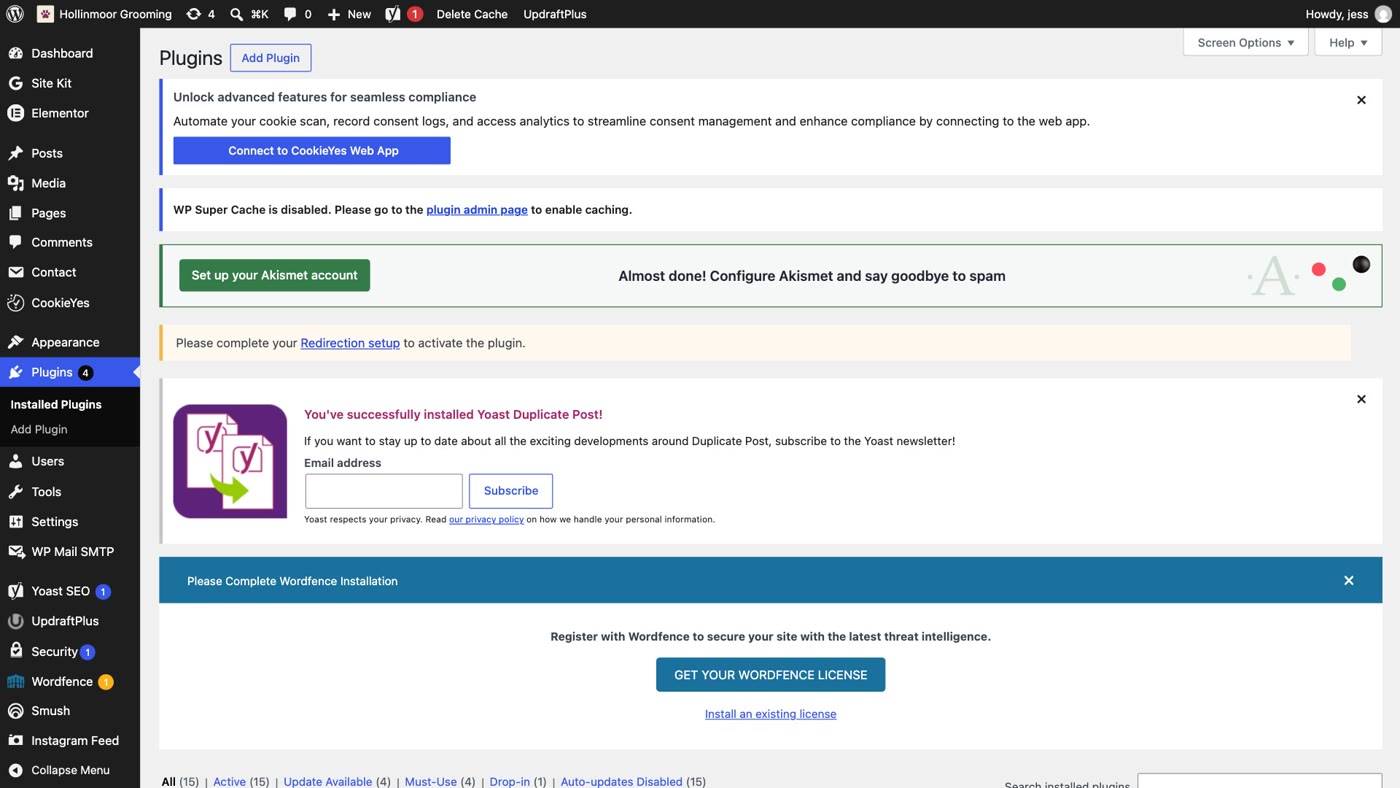
- Go to Plugins and click Inactive. These are installed but switched off, so nothing on your site is using them. They are your first and easiest cuts (step 7 deletes them).
- Click Active and read every row. Each plugin has a one-line description under its name. For each, ask two questions: what does this do, and do I still need it? If you don't know what one does, click View details, or leave it on for now and come back to it.
- Write a short list: keep, not sure, remove. It takes ten minutes and saves guessing later.
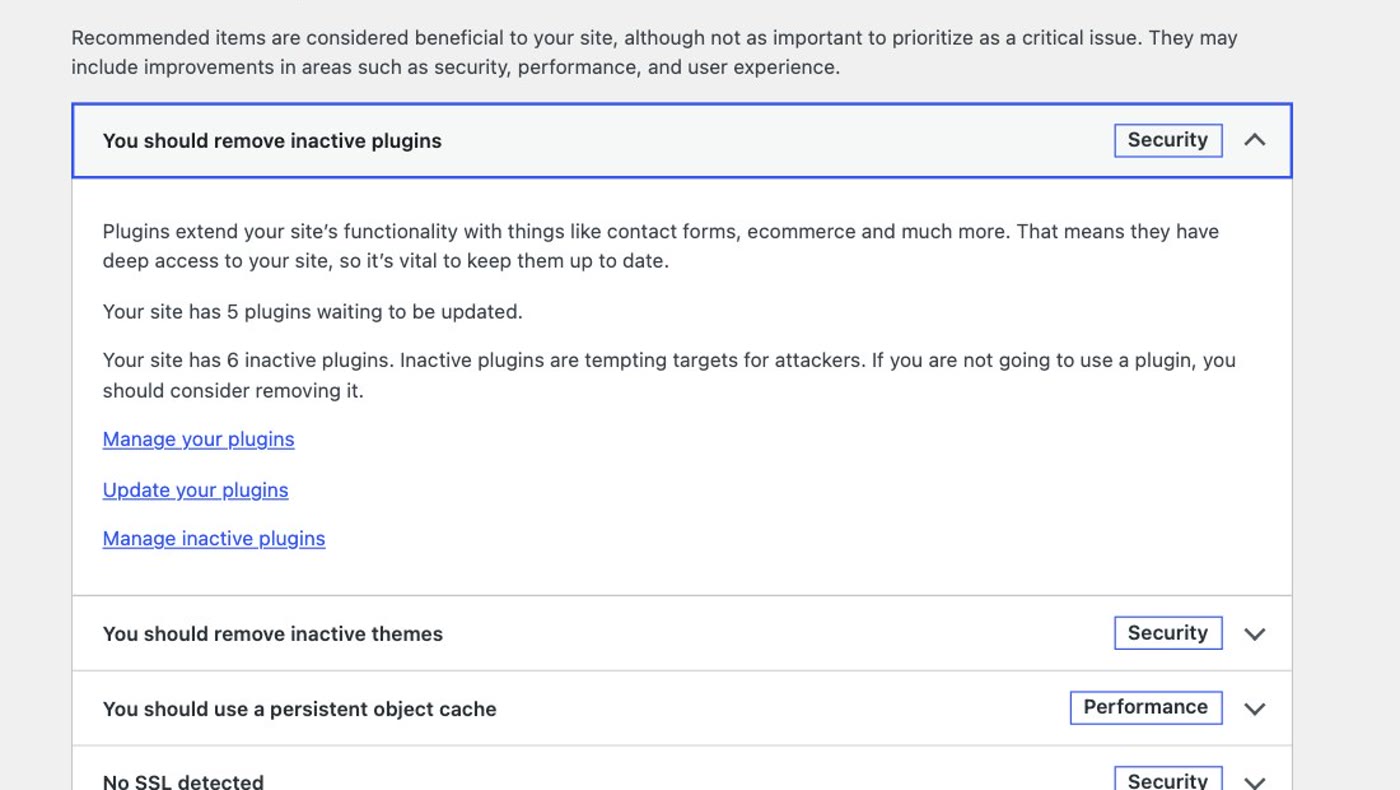
- Open Tools → Site Health. If you have switched-off plugins, it says so: "You should remove inactive plugins … Inactive plugins are tempting targets for attackers. If you are not going to use a plugin, you should consider removing it."
Step 3: Find the doubles
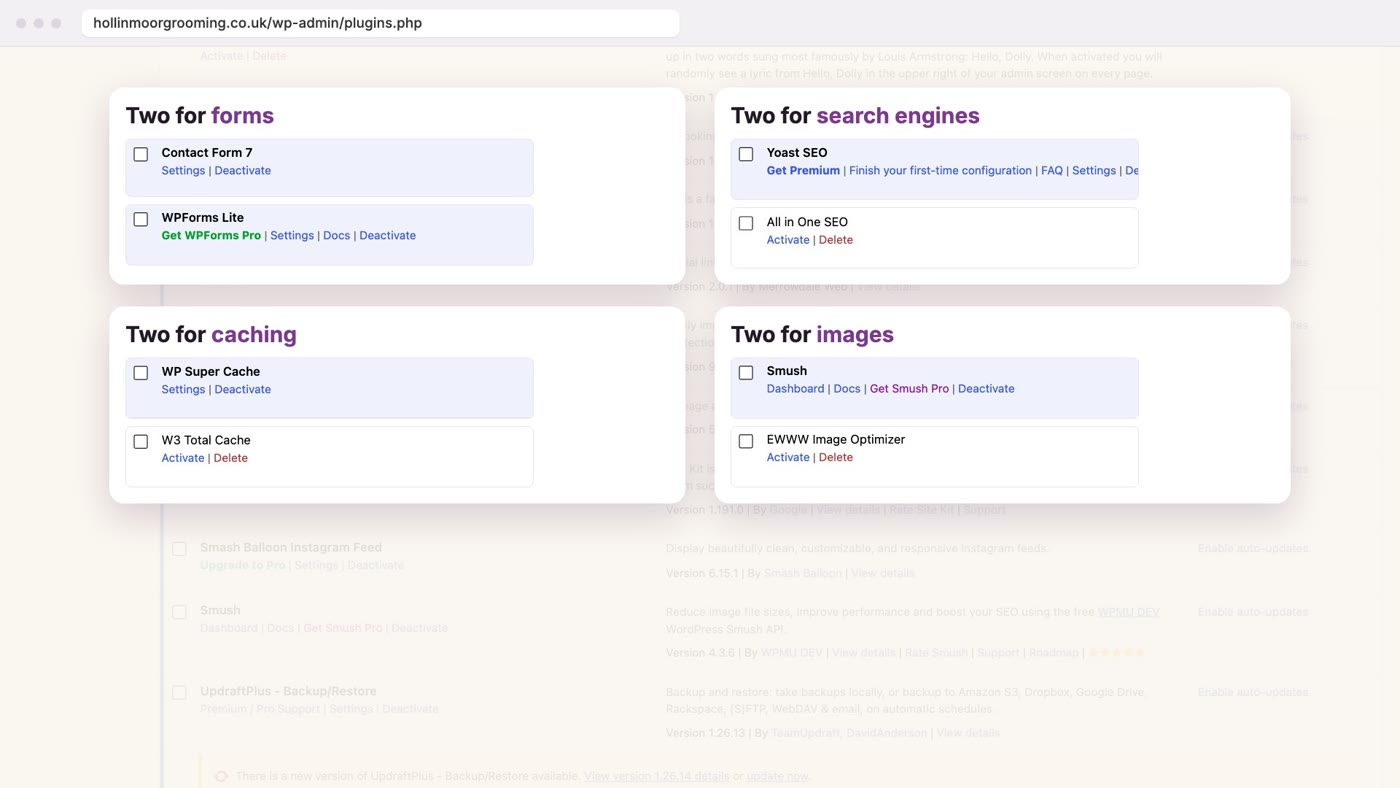
Two plugins doing one job is the most common kind of pile-up: you tried one, then another, and both stayed.
- Look for pairs in your list: two form plugins, two for search engines (SEO), two for caching, two for images, two for backups, two for security.
- Find out which one your pages really use. For forms, open the page with the form in the editor and see which plugin's form is in it. A form plugin with no forms in its own list is not being used.
- Mark the other one for removal. Two plugins doing the same job can also get in each other's way, so keeping just one is tidier as well as shorter.
Step 4: Check the dates
A plugin nobody looks after any more won't get fixes. You can see how well looked after each one is without leaving your dashboard.
- Click View details under a plugin's name. A window opens with the plugin's page from the WordPress.org directory.
- Read two lines on the right: Last Updated, and Compatible up to (the newest WordPress version its author has tested it with).
- Watch for the warning. If the author hasn't tested it with your version of WordPress, the window says so in a yellow box: "This plugin has not been tested with your current version of WordPress." On the plugin's WordPress.org page, one that is three major versions behind carries a stronger notice, and one removed from the directory says "This plugin has been closed".
- Plan to replace anything years out of date, especially if it does a small job. Step 6 shows what to replace it with.
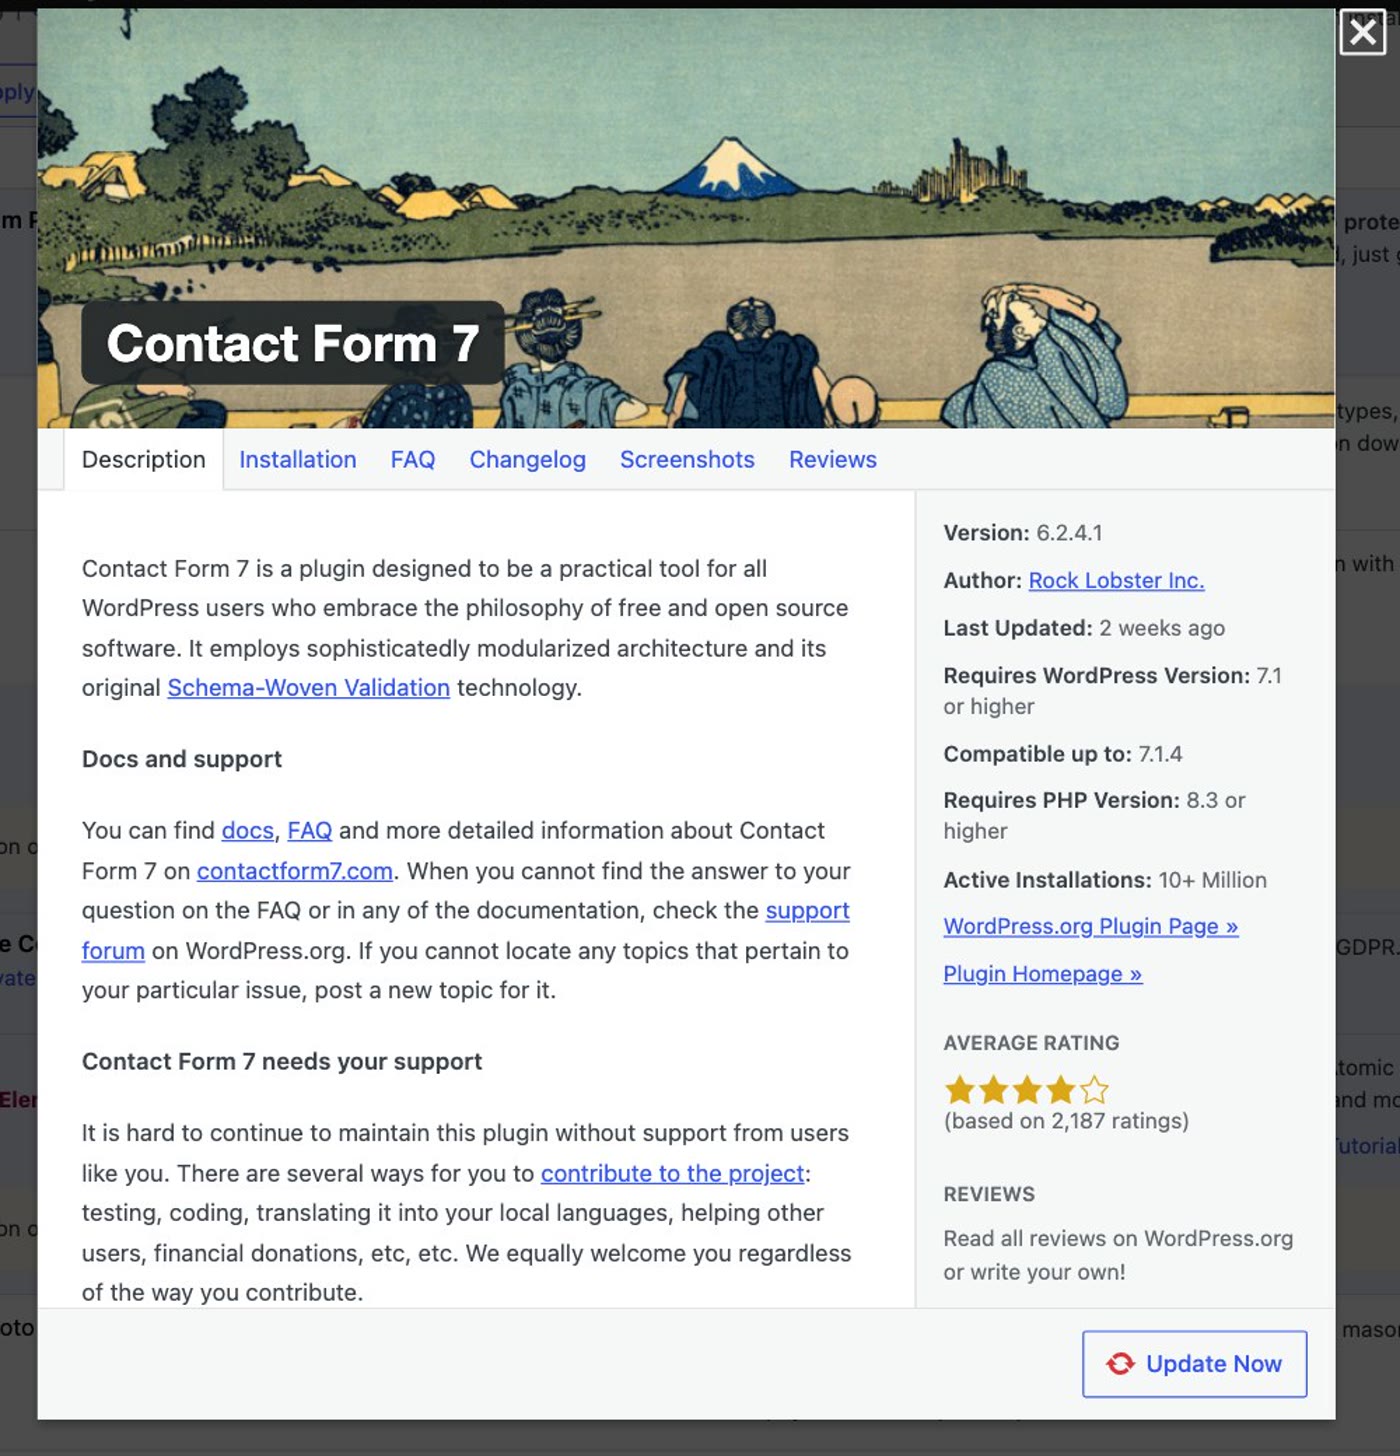
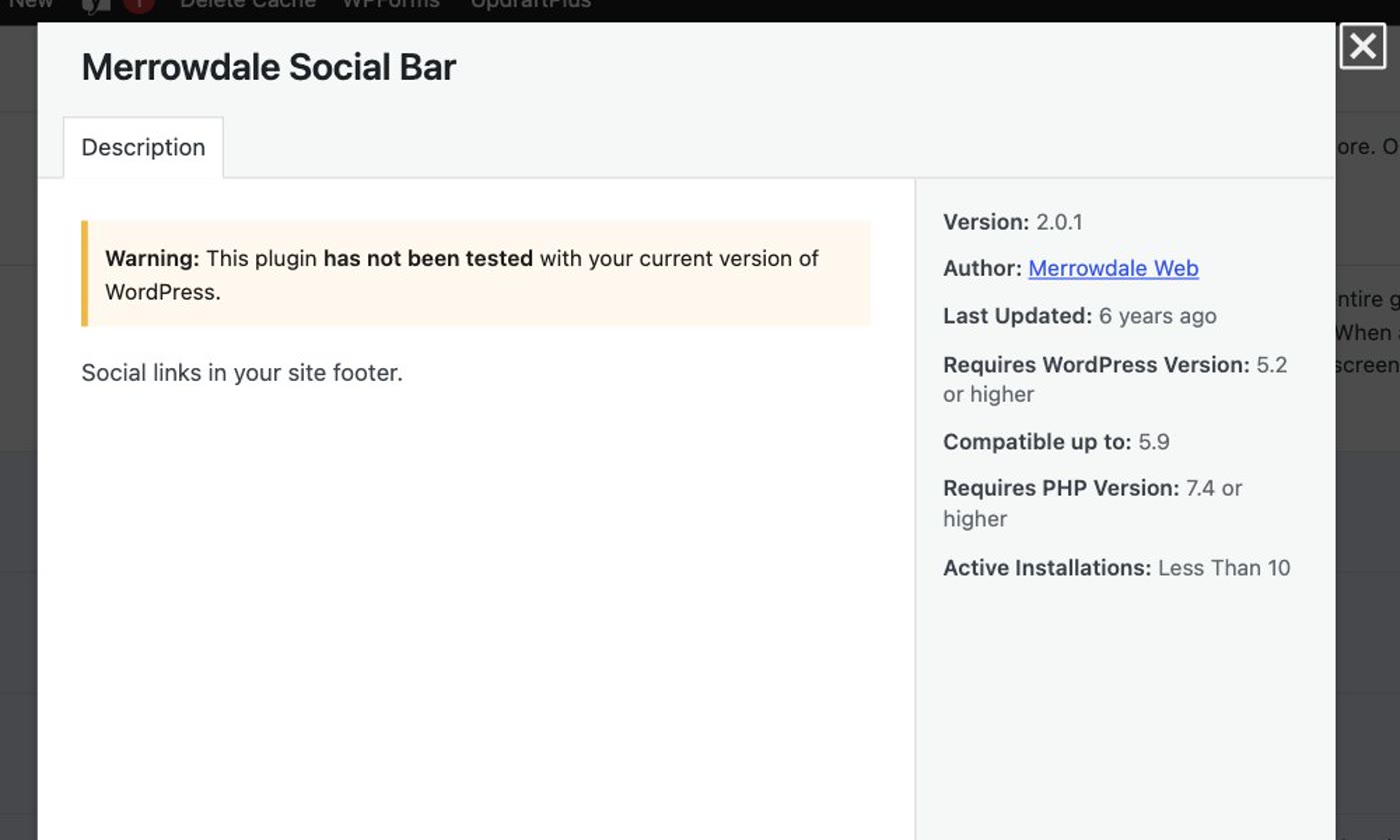
No "View details" link? That usually means the plugin didn't come from the WordPress.org directory (a paid plugin, or one someone made for you). Check its maker's website for its last update instead.
Step 5: Switch them off one at a time
This is the step that keeps the site safe. WordPress's own troubleshooting advice is the same: one plugin at a time.
- Deactivate one plugin from your "remove" list. Just one.
- Open your site in another tab, logged out (a private window works), and check the pages that plugin might touch: the home page, any page with a form, a gallery or a button, and send yourself a test message through the contact form.
- All fine? Move on to the next one.
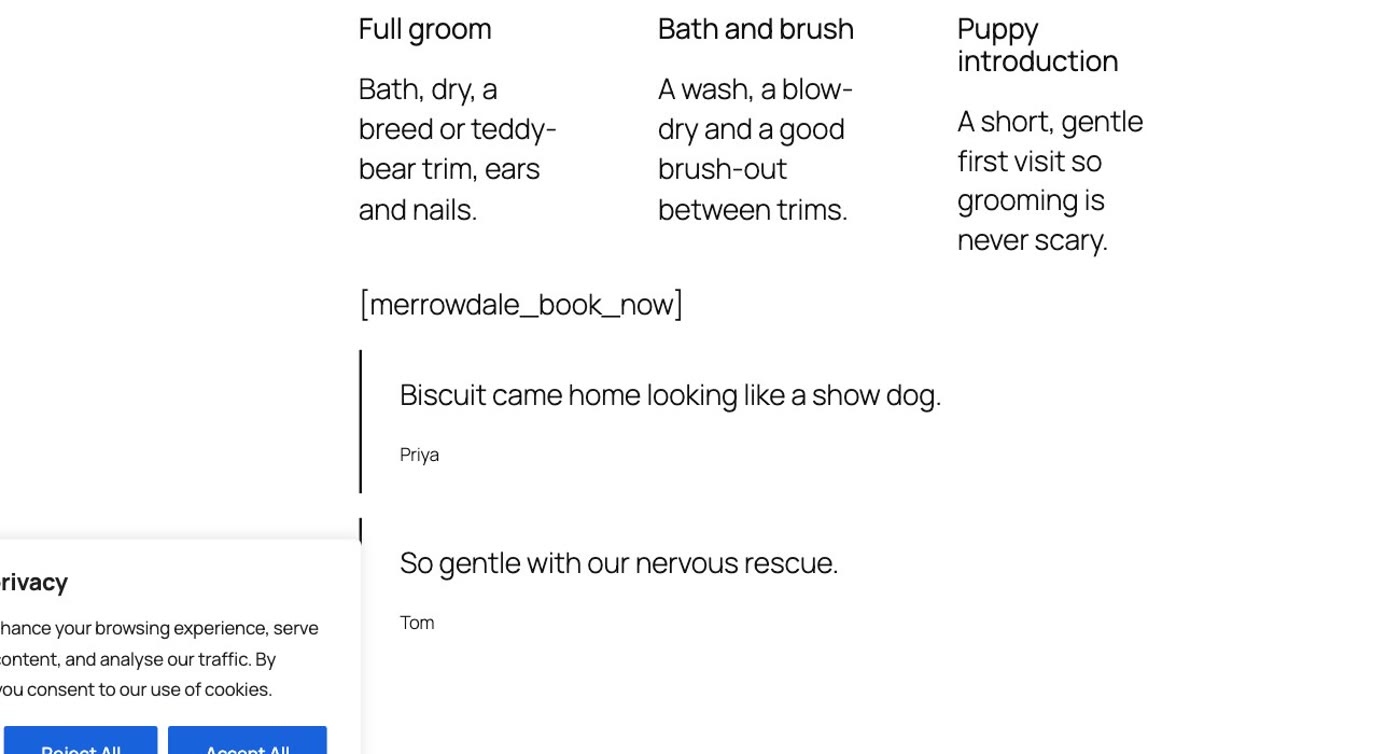
- Something broke? Switch that plugin straight back on, and note what it does. A common sign: a button or gallery turns into text in square brackets, like
[book_now]. That is the plugin's placeholder tag, and it means the plugin is still in use on that page. It is a candidate for step 6, not a plugin to delete today.
Step 6: Use what WordPress already has
WordPress now does some small jobs that used to need a plugin. If a plugin does only one of these, you can swap it for WordPress's own feature, then switch the plugin off.
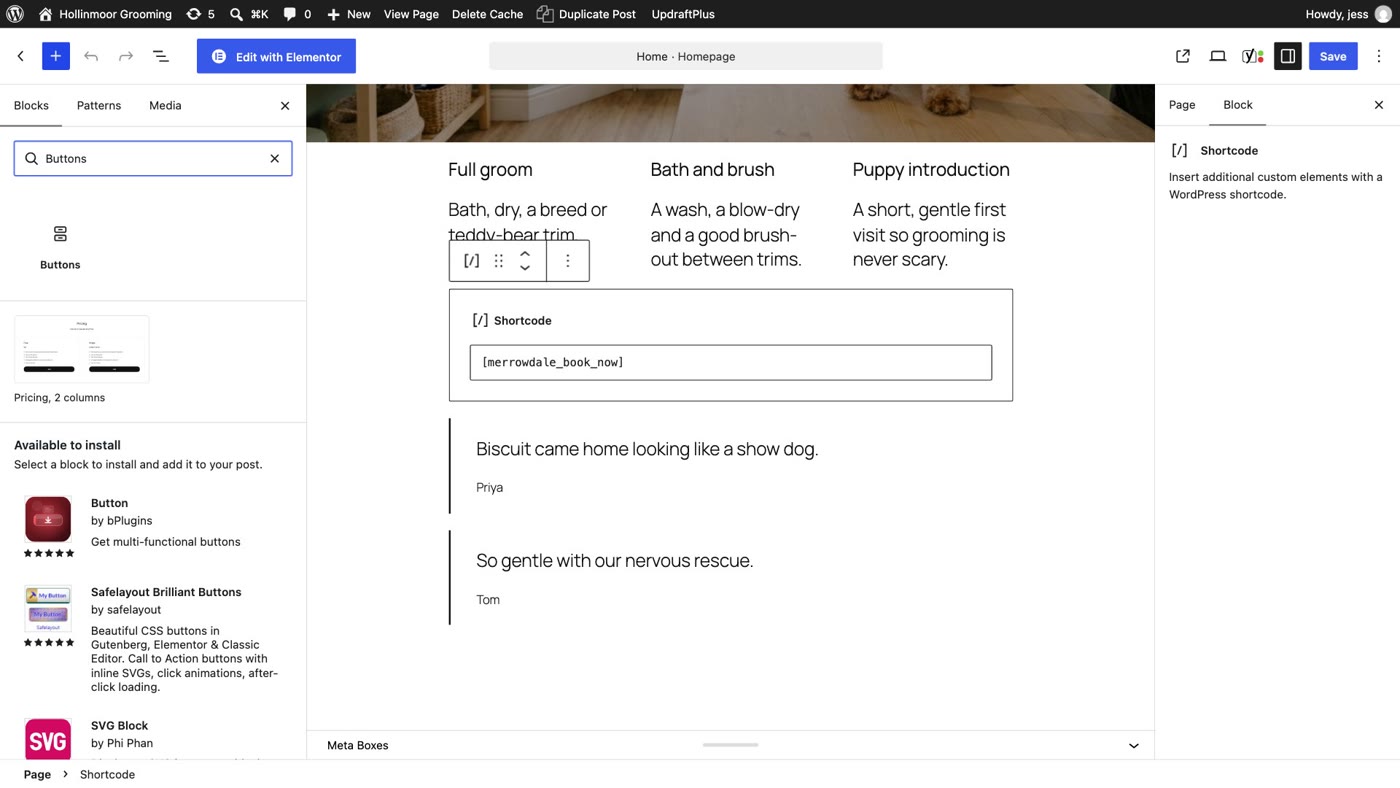
- A button plugin: use the Buttons block. In the page editor, add a Buttons block where the old button was, type the label, and add the link.
- Social links: use the Social Icons block, on a page or in your site's footer.
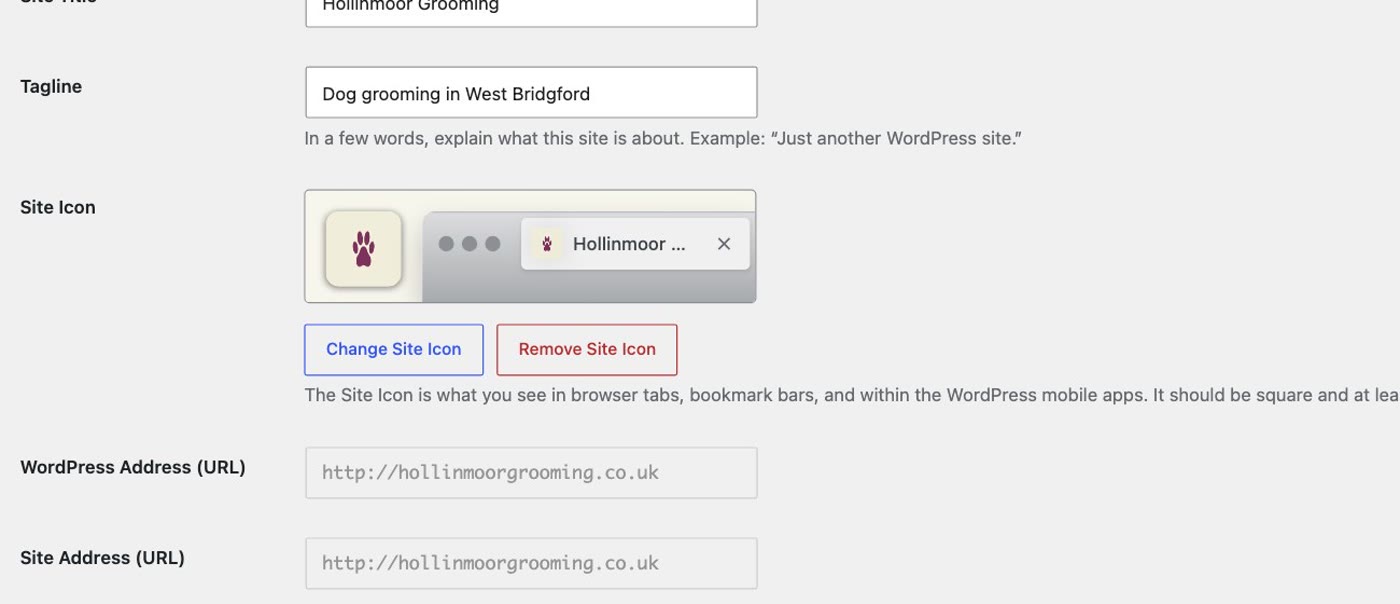
- A favicon (the little picture in the browser tab): go to Settings → General → Site Icon and choose an image. This has been built in since WordPress 6.5.
- A sitemap plugin: WordPress has made its own sitemap, at
yoursite.com/wp-sitemap.xml, since version 5.5. If your SEO plugin already makes one, it may switch WordPress's off in favour of its own, so you don't need a third. - Then switch those plugins off and check the page again, as in step 5.
Step 7: Delete what you switched off
Deactivated is not gone. A switched-off plugin is still on your site, and WordPress still checks it for updates.
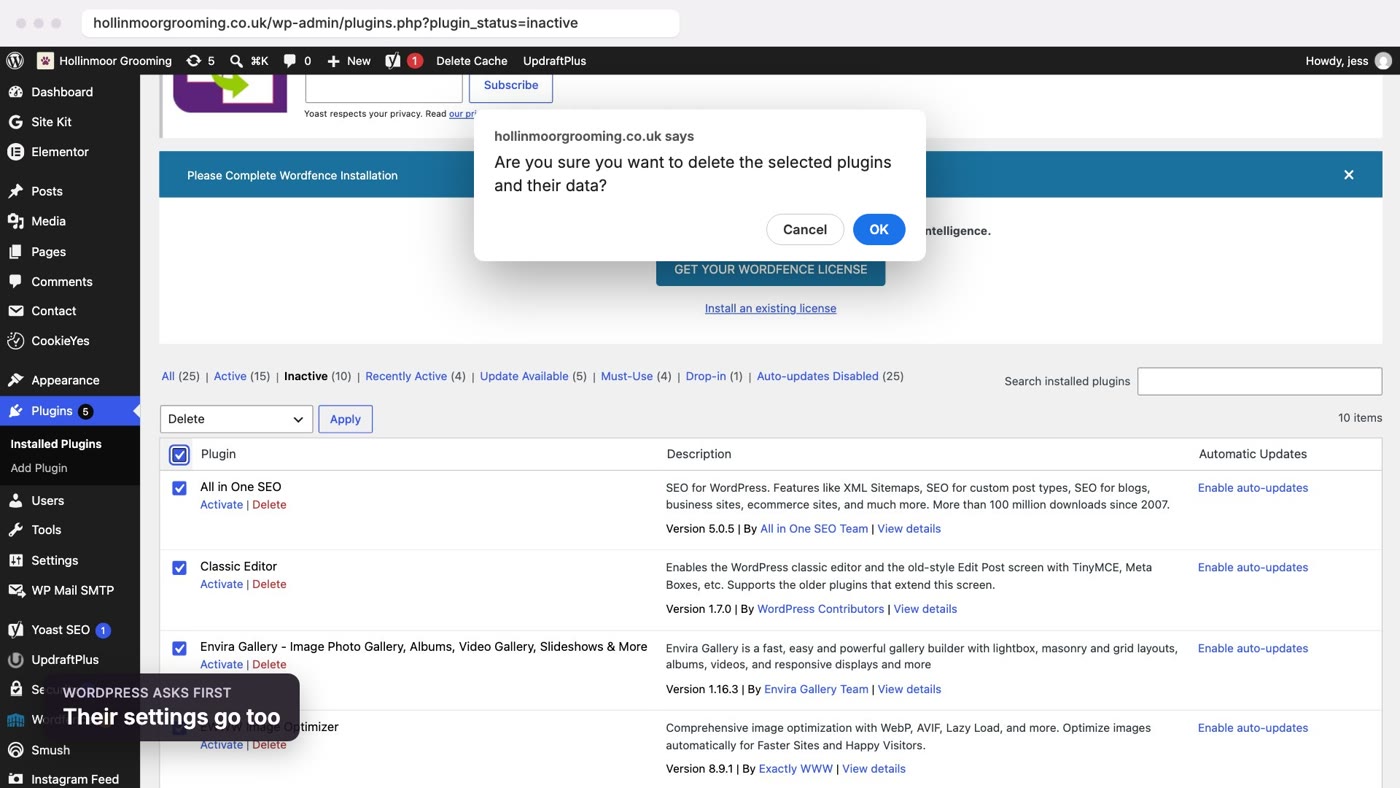
- Go to Plugins and click Inactive. Everything you switched off in steps 2 to 6 is here.
- Tick the box at the top to select them all, choose Delete from Bulk actions, and press Apply. WordPress only offers Delete for plugins that are switched off.
- WordPress asks first: "Are you sure you want to delete the selected plugins and their data?" Deleting is when a plugin is meant to remove its own settings, so if you think you might want one back one day, note its settings before you press OK.
- Check Site Health again. The inactive-plugins recommendation is gone. In its place, the updates still waiting now show as a critical issue, "You have plugins waiting to be updated": run them after your backup.
Keep it from growing back
The honest part: the pile grows back. Every new need (a pop-up, a review widget, a booking tool) is usually solved with a new plugin, and the list creeps up again. So:
- Repeat this every few months. Back up, check the dates, switch off one at a time, delete.
- Before you add a plugin, look for WordPress's own feature first (step 6), and check its Last Updated and Compatible up to before you press Install, not after.
- When you try one and don't keep it, delete it the same day, not just deactivate it.
- Turn on auto-updates for the plugins you keep, from the Automatic Updates column on the Plugins screen (since WordPress 5.5), and keep that backup fresh.
- Step 1: back up first, from your hosting account or a backup plugin.
- Step 2: click Inactive; read every active plugin and ask "do I still need it?"; Site Health flags the switched-off ones.
- Step 3: find two plugins doing one job, and keep the one your pages use.
- Step 4: View details: read Last Updated and Compatible up to, and plan to replace anything years out of date.
- Step 5: deactivate one at a time and check the site in another tab; if something breaks, switch it back on.
- Step 6: swap small plugins for the Buttons block, the Social Icons block and Settings → General → Site Icon.
- Step 7: delete everything you switched off. Deactivated is not gone.
Or, there is another way
All seven steps make the list shorter. None of them stops it growing again, because on WordPress almost every new thing your site does arrives as another plugin to keep up to date. If your site is a few pages, a contact form, a gallery and a booking button, it doesn't need plugins at all: those can simply be part of the page.
Ullbek is an AI website builder. You give it your WordPress site's address, and it builds a new, custom website from your pages and photos: the same pages, your wording and pictures, a fresh design, the form wired to your inbox, the gallery and the booking button built into the pages themselves. There are no plugins and nothing to update, so there is no list to prune and no banners to dismiss. When you need something new, you say what you want, and it's added to the site.

- Give it your old site's address. "Rebuild [your address] as a new site. It's my current WordPress website. Keep every page and bring across the photos." It reads every page and downloads your pictures.
- Answer a few questions in one go. Usually the business name, what to do with any placeholder text, and your real contact details.
- Look it over, publish, then move your domain. Your WordPress site stays up until the new one is live, and your old page addresses can be kept so links and search results still work. The move guide walks through every step, including what to collect from your old host first.
In our tests, a six-page business site moved from its address in about seventeen minutes of building, with one round of questions. After that, there is nothing to prune: no plugins to check, no updates to run.
Leave the plugins behind
See how moving a WordPress site to Ullbek works, step by step.